Showing posts with label Treats. Show all posts

Sunday, April 3, 2016

Easter Treats

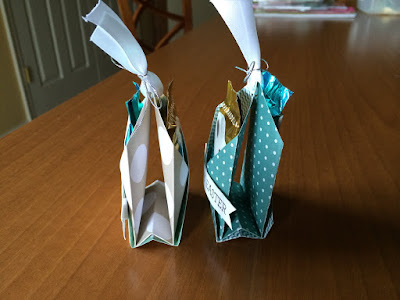
I made these adorable little pouches as an Easter treat for my piano students.  Each pouch holds two chocolates.  I found a big bag of Ghirardelli chocolate bunnies at B.J.'s for $10 (44 chocolates in the bag).


I found instructions for making the pouch from Dannie Graves here.  I had to tweak the measurements and trim two corners to make it work for the bunny size chocolates.  You can make four pouches out of one 12x12 piece of DSP.  I used DSP from the 2014-2016 In Color paper stack, and some from the It's My Party paper stack.  The words are from the Crazy For You stamp set.

Watch Dannie's video linked above to see how to score and fold the pouch using the Simply Scored diagonal plate.  These are my measurements and some general instructions:

Start with a 5 1/2 inch square piece of DSP.  I'm showing white to make it easy to see.  Score from one corner to another, then score 1/2 " on each side of that middle line.  Rotate your DSP to the left one turn, and score diagonally 1 1/2" from each corner.  Scoring is done.

Turn so the wide strip is running down the middle.  Fold the two sides in and trim the corners that go over the edge.

With the sides folded in, fold the DSP in half towards you on the score line that runs down the the middle.

Then lift at the bottom and fold it backwards on the 1/2" score lines.  Watch the video if this is totally confusing!

Punch a hole in the top and tie closed with a ribbon.  That's right, no adhesive.  Bonus!

Decorate the pouch and fill with chocolates!

Sunday, December 6, 2015

December Make & Take

We made some fun projects at our Make & Take class on Saturday! Here are pictures for all the projects and instructions for the first one.  If you have any questions about the others, let me know!

Project 1--A simple yet classy gift card holder that works for men or women.


I found instructions for this cute idea HERE.  

How to make it:
1.  Take a 5" square piece of Real Red cardstock and use the envelope punch board to make the smallest envelope (gift card size).  No need to tape the envelope together, just fold it up and use a belly band to keep it closed.  
2.  Use a Basic Black strip of cardstock to make a belly band, 3/4" by 8", fasten with tear tape.  Cut a 3/4 " black square to put on top of the buckle.
3.  Punch the belt buckle out of silver glimmer paper using the label bracket punch.  
4.  Attach the 3/4 inch black square to the top of glimmer buckle using strong adhesive like tear tape.  
5.  Attach the buckle to the band with dimensionals.  The band can slide off and on so you can open the holder and put your gift card inside.
6.  Add a rhinestone to the middle of the belt if desired.

As you can see, you can have your holder face the wide direction, or flip it to be the tall direction and put buttons and buckle on the back side.  Add some ribbon to the top so you can hang your gift card holder on the Christmas tree.  Super cute and fast to make!


Project 2--Winter scene window card


I made this lovely card at a class planned by my friend, Michelle Suit, and knew I wanted to share it with my group.

Stamps: Lovely as a Tree, Oh What Fun
Ink: Lost Lagoon, Soft Sky, Early Espresso
Cardstock: Whisper White, Tip Top Taupe, Lost Lagoon
Other: 1 1/4 inch punch (punch out a post-it note and lay it down while sponging around it to create the moon), 2 1/2 inch punch (for window), Decorative Dots embossing folder, 2-way glue pen, Dazzling Diamonds glitter, sponges

Project 3: Wondrous Wreath Card (I'm doing a whole class around this stamp set, so check back next week for more samples)


Project 4: Another blue Christmas card.  I love blue!


Project 5: Another cute Santa project holding yummy chocolates.  This project was planned by my friend, Lorinda McDaniel.  We do this class together, with each of us planning some of the projects.  This gives our attendees variety with our different styles.


Bonus Projects!  It's Christmas so we couldn't stick to only 5 projects!  We had to add a couple extra surprises!

Ghirardelli Chocolate Treat Packets:


A fun Christmas Tag, also planned by Lorinda:


We hold our Make & Take Class the first Saturday of the month in Gainesville, VA. I hope you can join us for our next one!  It's not to late to sign up for my Wondrous Wreath class next Saturday, December 12th, at 9:30 a.m.  See pictures HERE and e-mail me if you want to come: stampwithmarsha@gmail.com.


Wednesday, October 28, 2015

September 2015 Paper Pumpkin Kit

I have really loved the AWESOME stamp set that came in the September Paper Pumpkin kit!  I will admit I wasn't thrilled at first when I opened my box and saw that it was a kit to make treat bags instead of cards. However, the treat bags turned out really cute AND I have used the set of fifteen stamps over and over again for various projects.


Of course, I used it for cards:


I used it to make tags for various fall and Halloween treats:


These little mints were easy to decorate and I think they will be so cute on the Thanksgiving table.


I also used the "You're So Sweet" stamp to make these cute little Ghirardelli tag treats that were NOT fall themed.


And yes, I did use the set to make the treat bags as described.  They were popular at a craft fair I did and I have a couple left to share with my son's preschool teachers.  Hint: The paper did not curl for me well when I tried using the straw as instructed.  It worked much better with a bone folder.


The September Paper Pumpkin kit ended up being a winner in my book!  

If you haven't signed up for Paper Pumpkin yet, you should!  It's so fun to receive your monthly kit in the mailbox!  You can order prepaid subscriptions for one to twelve months, or get a monthly subscription here.  Please choose Marsha LaFroth as your demonstrator. :)