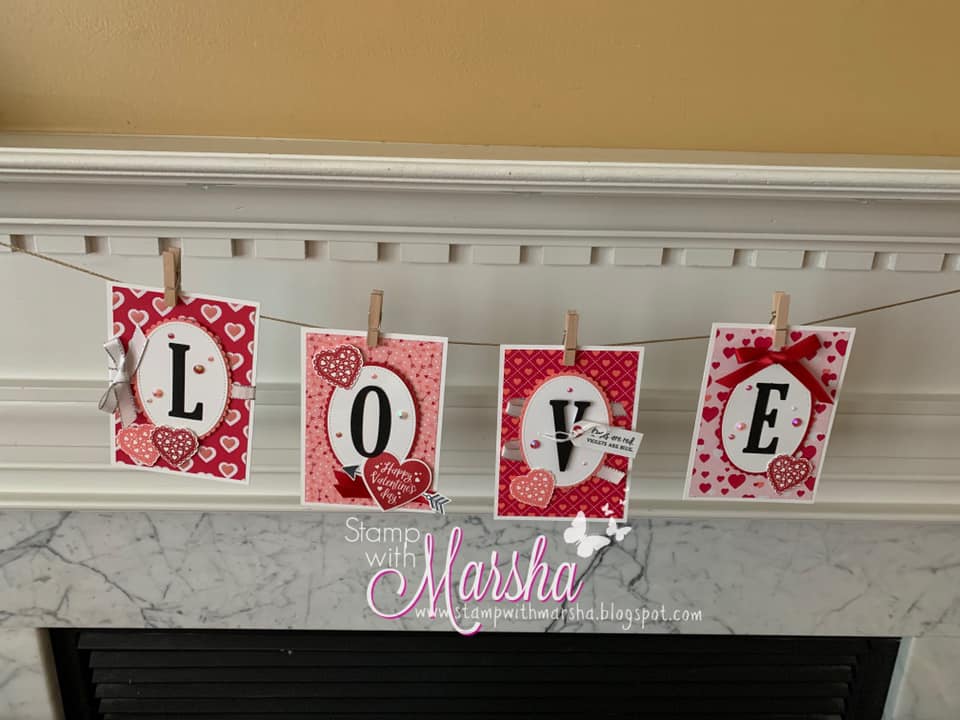
Love is in the air! The From My Heart Suite in the Mini Catalog is perfect for making cards, party favors, and home decor items. We made this Love banner at my recent Bingo event. This banner was inspired by a Fall banner I saw created by B.J. Peters HERE. I used her measurements and just changed the decor from fall to a Valentine's theme. The beautiful DSP and gems do most of the work! Guests could choose to hang their banner horizontally (as shown above) or veritcally (as shown below). Vertical was the winner!

Measurements:
- DSP layer on each card: 3-1/2" x 5"
- Thick White Cardstock Layer: 3-3/4" x 5-1/4"
- Whisper White tag piece: 2" x 3/4" (trim after stamping if needed)
- For the ovals, I used the largest stitched oval die for the white pieces and the largest layering scallop die for the scalloped mat behind the white oval.
- Die-cut your letters from Basic Black Cardstock (I forgot to add it in the supply list below)
Tips for all 4 Cards:
- Add the gems after completing each card. I squirted a few tiny dots of glue on the card, then added gems using craft tweezers to help me pick up those tiny ones!
- Glue your white stitched oval piece to the scalloped oval, then attach the ovals to the card base with dimensionals.
- The letters are all glued flat EXCEPT for the V letter which is lifted on foam strips after you tie the tag to it.
- Before putting each card together, stamp all of your small scalloped hearts in Real Red (3) or Flirty Flamingo (2), then fussy cut (or use Scan-n-Cut if you have one). You will also need to stamp the arrow in Basic Gray and fussy cut.
L Card--Cut two pieces of ribbon, one about 6" and one about 10". Wrap the 6" piece around the front of your DSP and tape on the back. You can do this before or after you attach the DSP to the white base. Put the rest of your card together as shown, using dimensionals under the scallop oval piece and both hearts. Tie a bow out of the 10" each piece of ribbon and attach to the card with a glue dot or tear tape.
O Card--Add the letter O last so it can overlap your heart a bit. Stamp the large heart in red and punch it out. Tape the arrow to the back of the large heart. Attach your DSP to the card base and add your ovals to the front with dimensionals. Fold 6-7" of red ribbon in half and attach to the bottom of the card with a strip of tear tape. Put mini dimensionals on the card to attach the heart but avoid putting them where they will land on the ribbon. Glue your O down.
V card--Attach your DSP to the card base, then put a strip of tear tape down the middle of the card as shown in the photo. Peel the backing off the tear tape and use it to hold your ribbon in place as you lay it across the card. Put mini-dimenisonals on your card base, avoiding the ribbon, then attach your oval.


Stamp your tag and trim the top two edges with scissors to get the shape shown. Tie it to your V with the twine, or just make a bow with the twine and add it with a glue dot. I used adhesive foam strips to add the letter to the card, avoiding the place where the twine was, but if you don't tie the twine around, you could glue it flat and add the tag with dimensionals.
E Card--Put a mini dimensional right above the oval to lift the bow. Use a glue-dot on the back of the bow as well since the dimensionals don't stick well to ribbon.
Watch the video below to see how to make this into a vertical banner.
Horizontal Banner--Attach your cards to string with mini-clothespins. Then tape or tie the string where you want it.
Thank you for visiting my blog. I hope you enjoy making this banner! You can scroll to the end of this post to see a list of supplies used and add items to your cart. If you place an order, please use the February Host Code: PKBHVTQ4. If your order is over $50, you will receive a free package of medium envelopes from me, plus you will get to choose a free Sale-A-Bration item at check-out!
Happy Stamping!
Marsha
")

 Double-Stitched Satin Ribbon")


Large Letters Framelits Dies
[141712]


