Thursday, January 16, 2020

M & M Candy Sleeve


The From My Heart suite on p. 9 of the Mini Catalog was one of the first new suites to catch my eye.  It includes two different heart punches!  I love punches more than dies because they are so quick and easy, especially when making multiples.  I saw a Christmas version of this candy bar sleeve made by Stacey Cogswell on the Demonstrator Facebook page and wanted to try a Valentine version for our recent Super Saturday event.

Measurements:
  • Flirty Flamingo Cardstock (box wrap): 6" x 7"; with 7" side at the top, score at 1/2", 1 1/4", 3 3/4", 4 1/2"
  • From My Heart DSP: 2" X 5 1/2"
  • Whisper White Cardstock: 2 1/4" x 5 3/4"

Instructions:
  1. Assemble your sleeve by folding on your score lines.  Attach a strip of tear tape to the 1/2" flap and wrap it around an M&M box, tucking the flap under the other end of card stock so it doesn't show.
  2. Add your white layer and DSP layer to the box top.
  3. Tie Real Red Double-Stitched Satin Ribbon around the box.
  4. Stamp the "Happy Valentine's Heart" from the Heartfelt stamp set in Real Red ink on white cardstock.  Punch out with the heart punch.
  5. Stamp the lacy heart in Real Red ink on white cardstock.  Punch out with the scallop heart punch.
  6. Punch out the third heart from the DSP with the plain heart punch.  Use the scallop heart punch to punch another heart out of Real Red Cardstock.
  7. The middle heart is lifted up on dimensionals, the other hearts are taped flat to the box front.
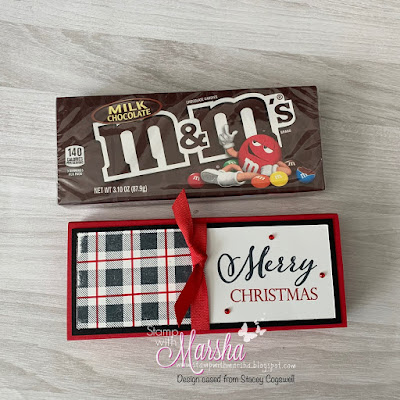
Here is the Christmas version I made of this box, cased from Stacey Cogswell.

This candy sleeve is perfect for all kinds of holidays and occasions.  I plan to try a birthday design next.  I would love to see what you make!

Placing an order this month?  Use the January host code and get a free ink pad with your order of $50 or more, PLUS a free Sale-a-Bration item!  January host code: MCQ7W2SR

Happy Stamping!
~Marsha
  • Would you like a chance to win free product from the Mini Catalog? Read about Stampin' Bingo HERE.
  • Need a stamping tool kit?  Check it out HERE.
  • Would you like a sample of all the DSP in the new catalog?  Learn more about my paper share HERE.


Friday, January 3, 2020

Snowman Hershey Bar Wrap

Happy 2020! Although Christmas has passed, I thought I would share one last project since snowmen are still around in January....at least I'm hoping for some January snow!  I found a picture tutorial for this adorable snowman from Twila Davis HERE.  I changed the greenery a little since I didn't have the punch she used.  In the photo above, I used a smaller circle punch for the buttons, but I ended up liking it better using the same punch for both the eyes and the buttons.  See the difference below.

Check out my quick tutorial video on facebook HERE, or read on for written instructions.

Supplies

  • Hershey Bar
  • Red Fleece: ½” x 12,” trim the ends to get a fringe pattern
  • Whisper White cardstock: 5 ½” x 5 ¾”
  • Basic Black Cardstock: 3/8” x 5 ¾” strip (for hat band); 1 1/8” x 1 ¾” (for hat top); 5 circles for eyes and nose; I used the Cookie Cutter Christmas punch to get the circles
  • Real Red Cardstock: 3/16” x 1 ¾”
  • Pumpkin Pie Cardstock: scrap cut into a triangle nose shape
  • Sprig punched out of Granny Apple Green Cardstock with the Sprig Punch
  • Red Rhinestone Basic Jewels
  • Black Sharpie Marker
  • White gel pen

Instructions
  1. Put tear tape on one of the 5 ½” ends of your white cardstock. Use a bone folder to slightly curve your cardstock in the direction you want it to go when you wrap it. Wrap the cardstock around the Hershey bar and attach to the other end of the cardstock (not to the bar itself so you can slide the wrap off if needed).
  2. Tie the fleece around the bar into a scarf.
  3. Use glue or glue dots to add your black circles for the eyes and buttons, and the nose. Draw the mouth with a black Sharpie. Note: The photo shows two different sized for the buttons and the eyes, but I ended up like it best with the same size for both.
  4. Put tear tape in the middle of your black hat band strip and attach the black rectangle piece to it (so it’s behind the band). Attach the red piece above the band. Put tear tape on both ends of the hat band and wrap it around the top of the snowman’s head.
  5. Cut off the top pieces of your green sprig and attach with glue.
  6. Add red rhinestones.
  7. Draw white lines on the eyes with a white gel pen.
I made a bunch of these cute little guys for my piano students.  It was a fun project!

Did you know it's Sale-A-Bration time?  You can choose a free stamp set or other item for every $50 you spend!  Check out the awesome choices HERE.  You will also get a free gift from me when you order $50 at my online store and use the January hostess code at check out: MCQ7W2SR


Hope your year is off to a great start.  Happy Stamping!

~Marsha