Friday, April 22, 2016

Get Better Quick Kit

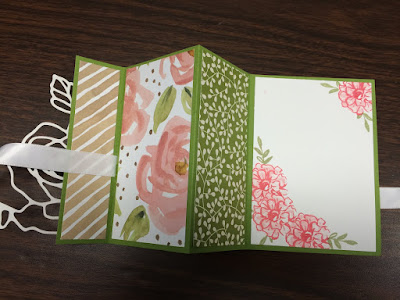
One of my friends sent me this darling idea from Dawn over at Dawn's Stamping Thoughts.  You can watch her tutorial here.  I couldn't wait to make it myself!  I added the tag and ribbon at the top.  I love this as an inexpensive way to let someone know you care about them when they are feeling under the weather.  This was one of the projects at my stamping class last night and everyone loved how they turned out.  If only I would have thought to take pictures!  The three stamp sets we used to make this--Apple of My Eye, Fabulous Four, and Merry Everything--are retiring soon, so grab them quick!

Here are measurements and instructions, if you have any questions, let me know:

Cut and score the following pieces from Crushed Curry Cardstock:
  • 4 ¼” by 10 ¼” inch (this is the card base and wraps around the tissue pack), turn horizontally and score at 1/2”, 1 3/8”, 3 ¾”, 4 5/8”
  • 3 x 4 ½” (this goes across the front to make a shelf for the cough drops), turn horizontally and score at ½” , 1 ¼”
  • 2 x 4 ½” (this piece goes on back to hold the soup packet), turn horizontally and score both ends at 1/2”


Cut the following pieces from the Crushed Curry striped paper in the It’s My Party Paper Stack:
  • 4 x 5 3/8” (cut TWO of these to cover the front and back)
  • 2 7/8” x 3 1/8” (this covers the front extra piece)
  • 1 7/8” x 3 3/8”  (this covers the back)

Other notes:
  • The white piece with the greeting is 1 ¼” tall.  Adjust the width after stamping the greeting.
  • The greeting is from the Fabulous Four stamp set.
  • Stamp three lemons from the Apple of My Eye set in Crushed Curry ink on white cardstock.  Use the 2-way glue pen and dazzling diamonds glitter to add sparkle. 
  • Punch the lemons out with the 1 ¾” circle punch.   Cut each lemon in half and add to the pouch with dimensionals.
  • Use a very strong adhesive such as sticky strip or tear tape to assemble your pouch.
  • The tag is from the Merry Everything bundle. 

Update on 5/24/2016:
I made the same kit using cherries instead.  I also saw this done on Dawn's stamping blog.  I love how it turned out!

Sunday, April 10, 2016

April Make & Take Projects

I enjoyed gathering with friends again yesterday at our Monthly Make & Take class.  These are the projects we made:


Project 1--Rose Wonder card

This card was CASEd from 
Sharon at As the Ink Dries and it uses the beautiful Rose Wonder stamp set from the Occasions catalog.  I love all the greetings in this stamp set.

To make the Rose Wonder card, we first wet embossed the rose with Whisper White embossing powder on Shimmery White cardstock.  Then we watercolored with Calypso Coral and Old Olive using Aqua Painters.  The greeting is stamped in Soft Suede.  At the end we used Wink of Stella to cover the whole rose adding extra shimmer (hard to see in the photo).

Project 2--Birthday card

Inside of Birthday card
This card design was created by Julie DiMatteo and I found it here.  It uses several goodies from the Occasions catalog: Number of Years Bundle, Balloon Bouquet Punch, It's My Party DSP, It's My Party Enamel Dots, Party Punch Pack (for the mini balloon inside), and the Baker's twine combo pack.  The white lines were added with the white gel pen.  The "Woo Hoo" came from the Party Pants SAB set.  The cardstock colors are Sahara Sand, Mint Macaron, Melon Mambo, and Daffodil Delight.

Blue Buterfly card

I found this card at Love for Stamping and thought it was so beautiful.  The butterfly has two layers.  The bottom layer is die cut from Island Indigo cardstock, the top layer is die cut from vellum cardstock (heads up, vellum cardstock is a bit difficult to die-cut). Gorgeous Grunge is used to add speckles to the background and the tiny flower stamped in Pool Party ink comes from the Hello Sunshine Paper Pumpkin stamp set. The words are from the Crazy about You stamp set.  The rhinestones add some final sparkle to the project.  The card base is Going Gray.
Recycled Pencil can

Lorinda planned this fabulous pencil holder project in honor of Earth Day as it is made out of many recycled products.  The brown layer covering the can is cut from a recycled brown paper grocery bag.  The striped paper is from the Typeset DSP.  What a resourceful project!
Recyclable Thank You card

This last card was also designed by Lorinda and I wish I would have taken a photo of the inside as it was also designed to be "recyclable."  She had a small envelope on the inside that you could put a note in and then re-use the card over and over.  Very cute idea!

Thanks to all who came to our class.  Looking forward to seeing you at the next one!

Sunday, April 3, 2016

Stamping Friends Regional Gathering

Lorinda, Cindy, Marsha, Erin, and Holly
I had a really fun outing with friends yesterday at Rose Ellen's Stamping Friends Regional Gathering.  We watched some informative and inspiring presentations, swapped cards (well, only Cindy made card swaps so the rest of us just enjoyed looking at hers), ate lunch, did make & takes, and overall had an enjoyable time getting ideas and stamping together.

My team leader, Michelle Suit, gave a presentation on Project Life and I felt inspired to give it a try, even though I gave up on scrapbooking years ago. This seems really doable and something I can just do here and there without feeling the pressure to scrapbook my whole life.  I try to keep a record of our family on my family blog that I print out, so I'm just planning to do some "highlight" project life books here and there.

Michelle Suit--awesome team leader!
One of the presenters, Cathy Williams, showed us how we can make our cards unique with fancy folds.  The card shown below was one of my favorites.  When you first open the card, you see the curtains covering the bear, as you pull it open, the curtains slide to the side and you see the bear peeking through.  So cute!

These are some of the make & takes we did.  I didn't end up finishing all of them:
This next project was one of my favorites, maybe because it was so simple and something I could easily reproduce and mass produce for a variety of occasions.  It uses a craft bag, folded to make a pocket for a gift card.  You slip a small card in the opening of the bag, and the gift card in the pouch in front.  Simple and cute!

Here's a few more pictures from the event.  Looking forward to the next stamping day!

Easter Treats

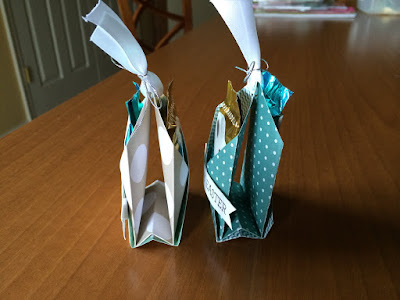
I made these adorable little pouches as an Easter treat for my piano students.  Each pouch holds two chocolates.  I found a big bag of Ghirardelli chocolate bunnies at B.J.'s for $10 (44 chocolates in the bag).


I found instructions for making the pouch from Dannie Graves here.  I had to tweak the measurements and trim two corners to make it work for the bunny size chocolates.  You can make four pouches out of one 12x12 piece of DSP.  I used DSP from the 2014-2016 In Color paper stack, and some from the It's My Party paper stack.  The words are from the Crazy For You stamp set.

Watch Dannie's video linked above to see how to score and fold the pouch using the Simply Scored diagonal plate.  These are my measurements and some general instructions:

Start with a 5 1/2 inch square piece of DSP.  I'm showing white to make it easy to see.  Score from one corner to another, then score 1/2 " on each side of that middle line.  Rotate your DSP to the left one turn, and score diagonally 1 1/2" from each corner.  Scoring is done.

Turn so the wide strip is running down the middle.  Fold the two sides in and trim the corners that go over the edge.

With the sides folded in, fold the DSP in half towards you on the score line that runs down the the middle.

Then lift at the bottom and fold it backwards on the 1/2" score lines.  Watch the video if this is totally confusing!

Punch a hole in the top and tie closed with a ribbon.  That's right, no adhesive.  Bonus!

Decorate the pouch and fill with chocolates!