I was so busy stamping in October that I never got around to updating the blog! I'm happy to share two home decor projects that I have made recently--a Fall banner and a Grateful shadow box. Although the classes have passed, you can still make them on your own. It's the perfect time to decorate for fall and Thanksgiving! These projects feature the beautiful new Gilded Autumn Designer Series paper, and the returning Gather Together Bundle. See a full supply list at the end of this post.
You may have seen the Love Banner I made back in October. This is a variation of the same project and hangs in the same spot on my wall. Now I've got to make them for more seasons and holidays! I did make the cards slightly bigger on this one.
Measurements for all cards:
- DSP layer: 3-1/2" x 5"
- Crumb Cake Cardstock layer: 3-3/4" x 5-1/4"
- Thick Vanilla card base: 4 x 5-1/2"
- For the ovals, I used the largest stitched oval die for the Very Vanilla pieces and the largest layering scallop die for the mat behind the oval. I used Cajun Craze for two of the scalloped ovals and Mint Macaron cardstock for two of the scalloped ovals.
- The letters were all cut from Early Espresso Cardstock using hte retired Large Letter dies.
F Card tips:
- The F is glued flat to the vanilla oval, which is also glued flat to the Mint Macaron piece. Then that oval piece is added to the cards with dimensonals.
- For the top leaf, I mixed Copper Shimmer paint (retired) with alcohol and used a spritzer to spray it on Crumb cake cardstock right before die-cutting. This gives the leaf a shimmer that is hard to see in the photo.
- The smaller leaf is cut from the darkest color in the Brushed Metallic Cardstock pack.
- For the spray, I used the Forever Flourishing dies to cut the Mint Macaron piece. I cut two of them and attached them with foam strips. Then I added some leaves and acorns that I punched out with the Autumn Punch Pack. The vanilla pieces were punched out with the Sprig punch and then cut up.
- I used Cinnamon Cider ribbon for the bow and added it with a glue dot. At the class, we decided to hang an acorn trinket from the spray, but I forgot to get a picture of it.
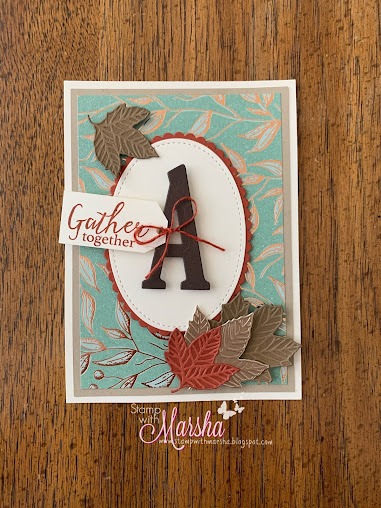
A Card tips:
- The A is popped up with foam strips. The vanilla piece is glued flat to the Cajun Craze scalloped oval and then popped up on the card with dimensionals.
- The leaves at the top of the oval and the bottom of the leaf "pile" were cut from Soft Suede cardstock that was first sprayed with the Copper shimmer paint mix mentioned above.
- The second leaf in the "pile" is cut from the lightest color in the Brushed Metallic Cardstock pack.
- The smallest leaf on the top of the pile is cut from Cajun Craze cardstock that was first misted with the Copper shimmer paint mix.
- For the tag, cut vanilla cardstock at 1-3/4" x 7/8". Stamp the greeting in Cajun Craze ink, then trim the top two corners to make a tag shape. Punch a hole with a 1/8" hole punch. The twine on this card is retired, but you can use Linen Thread instead. It looks like I tied the string around the A, but I really just tied it around the tag, then added the tag where I wanted it with dimensionals.
Tips for first L card:
- Attach the oval, letter, and tag in the same way as the previous card.
- The mint macaron leaf was first spritzed with a mix of alcohol and Champagne Mist shimmer paint. The other leaf was cut from the lightest color in the Brushed Metallic Cardstock pack.
- The pumpkins are from the Come to Gather stamp set. I stamped in Cajun Craze ink on matching cardstock. The smaller pumpkin is stamped in Crumb cake ink on matching cardstock. This image is two pumpkin image, but I just fussy cut the bigger of the two images after stamping.
- The mint ribbon is folded in half and attached with tear tape.
- The linen thread is tied into a bow and attached with a glue dot.
Tips for the final L card:
- The L is glued flat to the vanilla oval, which is also glued flat to the Cajun Craze piece. Add that oval piece to the card with dimensionals.
- The mint macaron leaves were spritzed with the Champagne Shimmer paint mix, as mentioned before. The other leaf was cut from the darkest color in the Brushed Metallic Cardstock pack.
- The large leaf was stamped in Cajun Craze ink on matching cardstock and die-cut.
- The ribbon was added with a glue dot.
I attached all of the cards to some jute glittery ribbon that I found at Michaels. You can watch THIS VIDEO from my Love banner class to see how to attach the ribbon to the cards. I did have to reinforce the top bow with a little glue in addition to the tear tape to keep it from falling off.
This post turned out so long that I'm going to share the Grateful Shadow box project in my next post. Thank you for stopping by. If you would like to place an online order in November, please use the following host code: RXRCFK3M. You will receive a free spool of ribbon from me if your order is over $50. Read more about my monthly free gifts here.
Happy Stamping,
Marsha
| | |  Large Letters Framelits Dies [141712] $99.00 | |
| | | | |
| | | | |
| | |


