
Spring is coming! I personally love the snow, but sunshine and flowers make me smile too. I'm glad I live in an area with four seasons! Today I want to share the measurements for making peek-a-boo cards, also known as shutter cards. When you open these cards up, the shutters slide to reveal a fun surprise. I don't know who invented this "wow" card, but I first learned how to make it at a class with Michelle Suit. We made something similar to the penguin card below, using the retired Snow Place stamp set:


A couple of years ago, I taught a specialty card class where we made the following version with the retired set--Spirited Snowman:


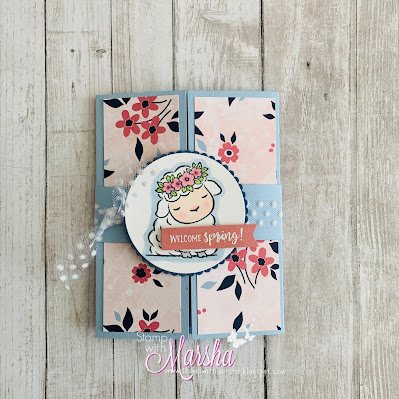
I love the Christmas peek-a-book cards, but it was time to try a Spring version! I used the new Springtime Joy stamp set combined with Paper Blooms DSP for one card (Sale-a-bration paper) and Hydrangea Hill DSP for the other card.


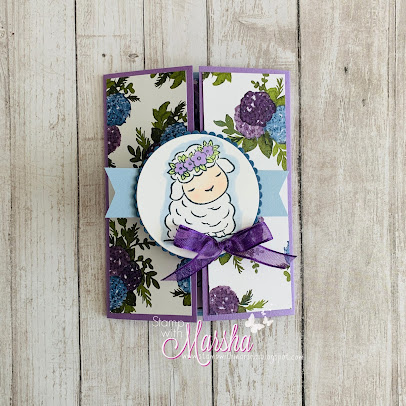

You can watch me make the purple version of the card above HERE.
These are the measurements:
1. Card base (Highland Heather): 5-1/2 x 8-1/2; with the 8-1/2 side at the top, you can score in 2-1/8 from each side, or score at 2-1/8 and 6-3/8.
2. Front DSP panels: 1-7/8" x 5-1/4" (cut two)
3. Inside window panel cardstock: 3" x 5-1/2"
4. Inside DSP to attach to the window panel: 2-3/4" x 5-1/4". Attach this piece to the cardstock piece first, then die-cut a circle out of it to make the window. I used the Layering Circle Dies 2-3/8" circle.
5. Inside shutter pieces: 3-1/2" x 4" (cut two). With the 4" side at the top, score 1/2" in from one side.
6. Next you need to draw and cut your shutter pieces (packman-mouth-looking). Take each piece you cut in step five; with the 4" side at the top, use a ruler to measure UP 1-3/4" and OVER 2" from the non-scored side. Make a dot with your pencil, then draw a line from that dot to each corner of the non-scored edge to form a triangle. Cut that triangle piece out. (This is easier to understand if you watch the video at the 8:28 minute mark)
7. Inside white piece to stamp your peek-a-boo image: 3" x 3".
8. Belly Band (optional, I did a belly band on the blue card but not the purple card): 1-1/4" x 10"
9. You can decorate the front however you want. I used the Layering Circle dies to cut a white 2-5/8" circle. I used the scalloped die from the same set to cut a Misty Moonlight circle slightly bigger. I stamped the image in black and colored with Stampin' Blends--Light Petal Pink and Light Flirty Flamingo for the face; Light Highland Heather and Light Granny Apple Green for the flowers and leaves; Light Seaside Spray for the shadow around the lamb.
10. Watch the video to see how to assemble the inside.
Although this peek-a-book card takes a little more time and care to put together, it's a fun card that will make the recipient go "wow!" My challenge for this week is to make a peek-a-boo card yourself and post it on the Happy Stampers with Marsha Facebook group by March 9th using the hashtag: #peekaboo. I will do a drawing for a $5 class coupon on March 10th.
Please use the following host code for online orders in March: UHJTRBMY
If your order is over $50, you will get a free gift from me--your choice of a classic ink pad or a Sale-a-bration item from my overstock stash.
Happy Stamping!
Marsha
This is a supply list for the purple card:
 | |||
 | |||
 | |||


 Gorgeous Grape Sheer Ribbon")


