Saturday, August 5, 2023

Retreat Make & Takes, Table Gifts, and other photos!


I recently hosted a 4-day craft retreat with these lovely ladies at the Best Western Hotel in Leesburg, VA.  The ladies had plenty of time to work on their own projects--card making, scrapbooking, sewing, etc.--but we also had six make & takes, catered dinners, and fun times with Bingo and even dancing!  There were display tables and stations where the attendees could borrow stamps, dies, and punches.  Each morning, there was a little gift waiting for them at their spot.


I found many of the ideas for my make & takes online, in which case I will share the links below.  I also typed up a PDF with photos and measurements for my guests and made "how to put together" videos for the make & takes (not the table gifts).  If you would like to receive this PDF and the video tutorials via email, you can purchase it below for $10.


On Friday we had a birthday theme.  We made the following projects:

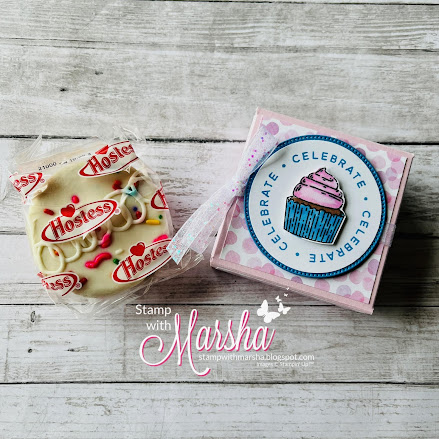
I found the video tutorial for the cute box by In the Pink Designs. We put Hostess cupcakes inside for a sweet little birthday treat.  We used the Circle Sayings bundle and Bright & Beautiful DSP.


For the Daisy bay window card, you can find the measurements and link to my Facebook live video on my blog HERE.  We used the Cheerful Daisies bundle and Countryside Inn DSP.


Our next project was a card with a pocket inside for a gift card. We used the Bright & Beautiful DSP again along with the Beautiful Balloons bundle.


On Saturday, we had a Christmas in July theme. We made these three projects:


We made two cards with the One Horse Open Sleigh DSP, which is an online exclusive product.  I learned the 3-panel Z-fold card pattern from Rachel Tessman.


This next card was inspired by a card I saw made by Tami White.  I just changed it slightly to make less cardstock pieces for me to cut!


Our final project used the retired Gnome dies.  I learned how to make this notebook holder from Schell Fabian.  The inspiration for the front came from a tag I saw by Tami Hewlett.


That's the end of the make & takes!  They were a big hit!  Next, I'll share what I made for table gifts/party favors for my guests:


These scissor/paper snip pouches were inspired by a smaller version I saw by Lillian Kemp using the Mini Pocket Envelope dies.  I didn't have those dies, and I wanted a bigger version, so I made my own version.  It was very simple to make.  You can see my quick YouTube tutorial HERE.

That project gave me some left-over 1" x 6" strips of the Glorious Gingham Designer paper.  I put two strips together and wrapped them around a pack of dimensionals.  I decorated it with elements from the Crafting for You bundle:


The idea for these cute candy pouches came from Laura Mellinger.  You use a clear envelope (sold by SU), put the candy in, and fold the top down and adhere on the backside, leaving space at the top for the topper.  The topper is 4-1/2 x 3, scored at 1-1/2


The final gift was a small handmade gift bag (made from retired DSP) filled with a glue eraser and Utah Mint Truffles (super delicious!).  You can find instructions HERE.


Well, that's a lot of photos for one post, but since I'm terrible about posting, I thought I better "dump" them all now! :)

Putting on a retreat is an immense amount of work, but it certainly brings me joy when all the guests are there and we are having a wonderful time together.  The next one will be January 25-28th, 2024.  Save the date and come join us!

Friday, August 4, 2023

Daisy Bay Window Fun Fold Card


The bay window fun-fold card was a new one for me!  I received the following card in the mail from Carol LeFave last Mother's Day and knew I wanted to give it a try!

I wanted to use the beautiful Countryside Inn DSP and Cheerful Daisies bundle to create this card.  The card does lay flat to mail and it does open.  After you open it, you tuck one little flap under the inside piece to get the bay window look.  This was one of the make & takes at my recent craft retreat.

When the card is flat, you don't see the DSP on the right side
because that piece is on the inside.

Inside view. The left floral flap is glued down flat.

I don't know who to credit with the original measurements for this fun fold card, but I will post them below.
 
Measurements (in inches):
  • Boho Blue card base: 4-1/4 x 11, score at 5-1/2, 6-1/2, 7-3/4, 9-1/2, and 10-3/4
  • Boho Blue (strip on the inside): 1 x 4-1/4
  • DSP (floral): 3/4 x 4 (cut 2)
  • DSP (navy striped): 1-1/2 x 4
  • White (inside): 3-1/8 x 4
  • White: scraps to die-cut the daisies and the tag
You can see a video of me cutting and putting this card together HERE.  I used a sponge dauber to add Lemon Lolly ink to the flower centers.  I daubed Granny Apple Green on the leaf and Boho Blue on the flower edges.

I hope you enjoy making this fun fold card.  I thought it was pretty cool and fairly simple compared to some.  Give it a try!


Product List

Wednesday, June 14, 2023

Let's Go Fishing DSP


With Father's Day fast approaching, I decided it was time to play with the new Let's Go Fishing DSP (Designer Series Paper).  This paper is part of a fabulous suite of products which includes stamps, dies, and an embossing folder.  Alas, I only have the paper, but I still enjoyed making a variety of cards with just the paper and greeting stamps I had on hand.

To make the cards shown above, I used the same card layout that I recently used with different paper--Countryside Inn DSP.  I don't know who I initially got the DSP measurements from for this layout, but it's a great card for showing off three different DSP patterns.

You can watch THIS VIDEO to see me make the following card.  The measurements are also listed below.


Measurements:

  • Fly DSP (left side): 1-7/8 x 5"
  • Net DSP (top right): 1-7/8 x 2-1/2"
  • Blue DSP (bottom right): 1-7/8 x 2-3/8"
  • Misty Moonlight Tag: 2-1/8 x 2-3/4"
  • Vanilla piece on tag: 1-7/8 x 1-7/8"
  • Vanilla layer behind DSP: 4 x 5-1/4
  • Misty Moonlight card base: 5-1/2 x 8-1/2 (score at 4-1/4)
  • The fish are fussy cut from the DSP.  I trimmed the top corners to make a tag and added the In Color Jute Trim (Pebbled Path color).  I pulled the trim apart to fray it.
  • The greeting is from a very old Paper Pumpkin kit (the first one I ever received!).
I used other patterns and colors to make two additional cards with this pattern:
The color of the card base and tag is Mossy Meadow.
The greeting is from Beautiful Balloons set.

The color of the card base and tag is Pebbled Path.
The greeting is from Beautiful Balloons set.


The In-Color Jute Trim includes 5 colors;
at least three of them work well with this DSP. 

This next card is a super simple card quick card using a 2" strip of DSP from the pack (2 x 5-1/2").  It is mounted on a Misty Moonlight cardstock strip (2-1/4 x 5-1/2").  The card base color is Crumb Cake.


The remaining cards were cased from other talented demos.  I will include the link where I found them.  Do check out the originals as they use fun images and greetings from the Gone Fishing bundle which I do not have.

The card above was cased from Rachel Traudt HERE.

The card above was cased from Susie Wood HERE.

The card above was cased from Brian King HERE.

Give these cards a try using the same Let's Go Fishing DSP, or use the pattern with other DSP.  I love DSP card patterns that can be used over and over!

That's all for today!  Please use the monthly host code on your online orders each month.  If your order is over $50, you will receive a free gift from me, plus a Frequent Stamper Reward Point.

Happy Stamping,

Marsha

Product List