Showing posts with label 2020-2022 In Colors. Show all posts

Wednesday, August 12, 2020

Happiest of Birthday Shaker Cards


Shaker cards are so much fun!  Today I showed how to make these cards on my Facebook Live video.  You can watch the video HERE to see how to put these together.  You will find the measurements and supply list below.

Measurements: 

  • Card Base: 5-1/2" x 8-1/2", folded in half (colors shown above are Just Jade, Misty Moonlight, and Bumblebee)
  • In Color DSP: 2" x 4-1/4"
  • White Cardstock to die-cut window: 3-9/16 (or 3-1/2 plus 1/16th), x 4-7/8"
  • White cardstock to stamp and lay behind the window: 3-1/2" x 4-3/4"
  • White cardstock for the inside: 4" x 5-1/4"
  • Window sheet: 3" x 4-1/4" (you may want wider than 3")
Here are some other cute shaker cards I made today with the Whale of a Time suite.

Thank you for stopping by today!  Please use the following host code on your online orders placed in August: Q7A4NMBX. If your order is $50 or more, you will receive a package of Snowflake Sequins or Jingle Bells.  Email your choice to me after you place your order.  If your order is over $150, do not use the host code as you will get your own host rewards AND the free gift from me.

Happy Stamping!
Marsha

P.S. The ink pads listed below are for the Just Jade/Melon Mambo version of the card that was made on Facebook Live today.

Product List

Tuesday, July 7, 2020

Mini Tic Tac Holders

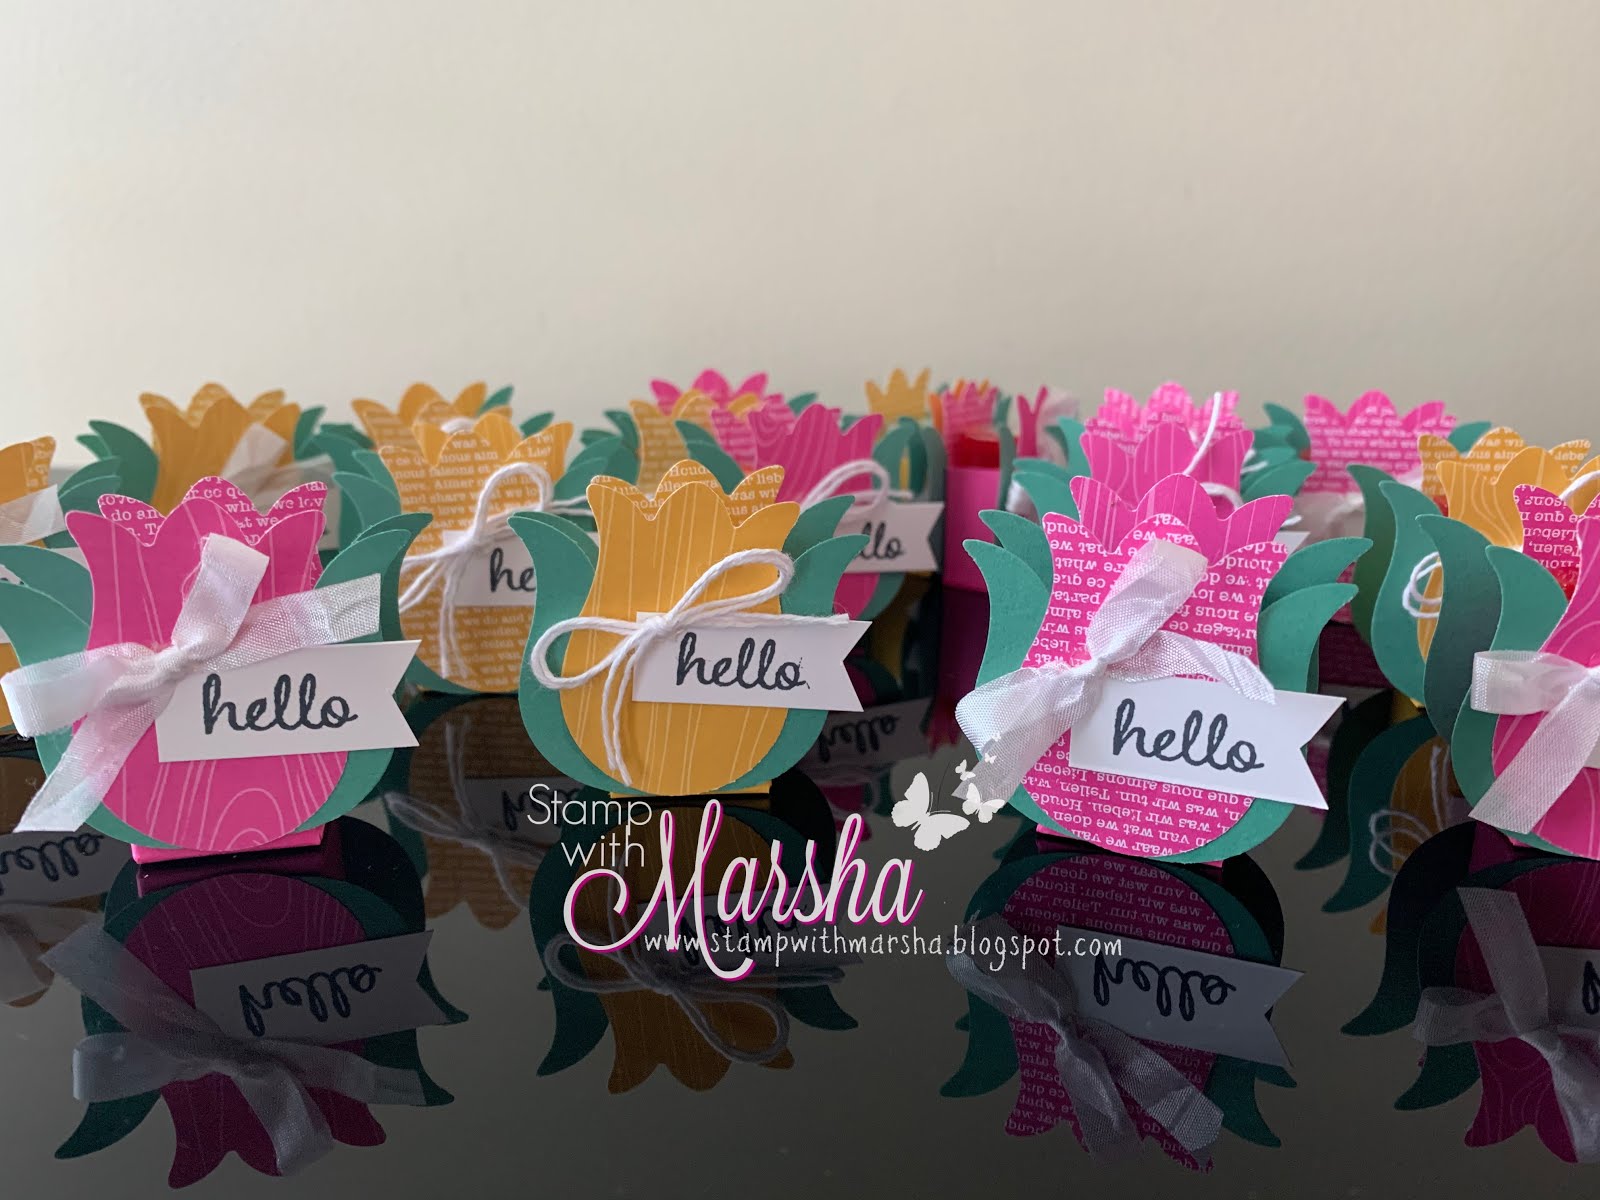
I saw a picture of these adorable Tulip Mini-Tic Tac holders and I just HAD to make them.  I ordered the Mini Tic Tacs on Amazon, with the plan to make them for Easter baskets, but it took TWO months for them to arrive!  Now, this was at the beginning of the Covid pandemic, when everything got delayed.  Right now Amazon says it will only take two days.  I'm just warning you that it might take longer!  I watched a video on YouTube by a German demonstrator, Ximena Morales. I did my best to convert the metric measurements to inches.

Measurements and steps:

  • Start with a piece of cardstock cut at 1-5/8" x 3-1/2"
  • With 3-1/2" side at the top, score at 5/8", 1-1/2", 2-1/8", and 3"
  • Turn and score at 5/8" (for the bottom flap of the box)
  • To assemble, watch my Facebook Live video HERE or the video link above by Ximena.
  • Punch your tulips out of the In Color DSP.  I used Bumblebee and Magenta Madness.
  • Punch your leaves out of Just Jade cardstock.
  • I used glue to attach the leaves to the Tulip and the box.
  • I stamped "Hello" from the Timeless Tulips stamp set.
  • I tied some bows with White Crinkle Seam Binding and some bows with retired white twine.  I added them to the project with a glue dot.

That's it! Although I didn't get to use these for Easter, I still gave them out as party favors at a recent stamp class.  I've also made two variations that I can use for Thanksgiving and Christmas.  For the Thanksgiving version, I used Harvest Hellos Stamp set and Apple Builder Punch.  The Snowman version comes from the Snowman Season Stamp set and Snowman Builder Punch.  The greetings are from past Paper Pumpkin kits.

I adjusted the box size for the pumpkin to hold two mini Tic Tac boxes. I adjusted the box size for the snowman to be a little taller, but the top of his body still sticks above it quite a bit. 

 Here are the alternate measurements:
The pink pox is the original size shown above.  The white box is 1-7/8 x 3-1/2.  The Tic Tacs go all the way in without the top peeking out. The third box is for the pumpkin and measures 1-3/4" x 5-1/4".  With 5-1/4" side at the top, score at 5/8", 2-3/8", 3", 4-3/4", and 5-1/4".  Then turn and score at 5/8".  The Tic Tacs will peek above the edge a little, but not much.

Thank you for stopping by!  Please use the following host code for online orders this month: Y6DZBVGA.  If your order is over $50, you will get a free acrylic block from me, your choice of C, D, or H.  If your order is over $150, do not use the code as you will get your own host rewards, plus the free block.  Email your choice to me after you place your order.

Happy stamping!

P.S. The supply list below is only for the Tulip version.  I posted this before I had made the alternate versions and then came back to add those today.

Product List

Wednesday, June 17, 2020

2020-2022 In Color Projects

I love the five new 2020-2022 In Colors! I like them each on their own, but I especially like how they look all together.  Note: The colors in these photos are brighter than in person.  My camera tends to make things look dark, so I used a brighter lens when taking the photos and it over corrected the other way.  Oh well!

You can watch me make these projects on my Facebook Live HERE.  The measurements for each project are listed below:

Hershey Nugget Packets
These fun little treats were inspired by the The Papered Chef.  I used the In Color Designer Series Paper (DSP) for one of the toppers and the Flowers For Every Season DSP for other one.
  • Tray (I used Cinnamon Cider): 4-7/8" x 2-3/8"; with 2-3/8" at the stop, score at 1/2" and 1-7/8"
  • DSP strips for the nuggets: 1" x 3"
  • DSP for the topper: 1-1/2" x 2-1/2"
  • Cardstock for topper: 2-3/4" x 3-1/2"
  • White label strip: 3/4" x 2-3/4" (before punching the ends with Lovely Labels Pick A Punch)
  • Just Jade label strip: 3/4" x 3-1/4" (before punching the ends with Lovely Labels Pick A Punch))


Sending Love Your Way Card
I love the new Rectangular Postage Stamp Punch!  I thought about just getting the punch, but I'm glad I decided to get the bundle to go with it.  It made this card really easy! Note: The pink rectangle also has an image stamped on it, but you can't tell in the photo.

  • Thick White Cardstock (card base): 5-1/2 x 8-1/2, score at 4-1/4
  • Whisper White cardstock: 4 x 5-1/4" (emboss with Subtle 3D Embossing folder)
  • Use scraps of cardstock from each of the In Colors (except Bumblebee) to punch the postage stamp shape
  • Bumblebee greeting strip: 5/8" x 3-1/2"
Celebrate Card
We made this card at my last Virtual Stamp Party.  The celebrate die is retired, but you could stamp any birthday greeting in that spot instead. Try making one with each of the different colors for the card base.  They all look great!
  • Card base (choose any In Color): 5-1/2 x 8-1/2, score at 4-1/4
  • Whisper White cardstock: 4 x 5-1/4" (use one for the front and one for the inside)
  • In Color DSP strips: 1" x 2"

Smile Card
These lovely card design came from Julie Davison.

  • Thick White Cardstock (card base): 4-1/4 x 11, score at 5-1/2
  • DSP Strips: 3/4" x 3-3/4"
  • Use scraps of cardstock from each of the In Colors to punch flowers with the Small Bloom punch
  • Pop the flowers up and add In Color Enamel Dots
As I mentioned before, you can watch me make these projects HERE on Facebook.  They were fun and simple to make.  I hope you'll give them a try!  Below are some other cards I made with the new colors.  The designs were inspired by Rochelle Block.  These were not so simple to make (die-cutting vellum is kind of a pain), but I love how they turned out. This picture more accurately shows the colors as it hasn't been brightened.


To purchase any of these supplies, simply click on the links below.  Please use the following code at checkout: EEBWAY92.  If your order total is $50 or more before shipping and tax, you get a free ink pad from me.  Please email your color choice to me after you place your order.  If your order is $150 or more, don't use the host code as YOU will get the host stamp rewards PLUS the free ink pad from me.  Yippee!
Product List