Saturday, March 16, 2019

Tea Party Favors & Gifts


Having a tea party soon?  I've got some great projects you can use as party favors, or maybe just a little gift for a friend who could use a cup of tea.  

When I first looked through the Occasions catalog, the Tea Together stamp set was the last thing I thought I would be buying as I don't drink tea!  However, I love pretty tea pots and tea cups and after seeing so many amazing projects from other stampers, I couldn't resist buying the stamp set myself.  I got the awesome matching framelits for free with the Sale-A-Bration special.  I have really loved playing with this sweet set!

Project 1--Scallop Tag Tea Packet Holders
I saw some gorgeous tags made my Peggy Noe and knew I wanted to case her idea and turn the tags into tea packet holder.  You can learn more about making this project on my YouTube video.  Measurements and supplies listed below.
Supplies
Stamps: Tea Together, Flourishing Phrases
Cardstock: Tranquil Tide, Shimmery White 
Ink pads: Tranquil Tide & Sahara Sand
Blends: Flirty Flamingo, Old Olive, Daffodil Delight
Tools & Embellishments: Tea Time Framelits, Lace embossing folder, Scallop Tag Topper Punch, Butterfly Duet Punch, Polka Dot Tulle Ribbon, Pearl Basic Jewels, White Baker's Twine, Glue dots, Dimensionals

Measurements
Tranquil Tide: 2" x 8", score at 4"; 3 1/8" x 1 7/8" (to emboss)
Shimmery White: 3" x 2" to stamp & die-cut tea cup; 2" x 2 1/2" to stamp and die-cut rose, 1/" x 1 1/2" for greeting (trim down after you stamp)

Project 2--Matchbook Tea Packet Holders

The base for these matchbooks is so easy to make!  Watch my video to see how easily you can cut four matchbooks out of one sheet of card stock.

Supplies
Stamps: Tea Together
Paper: Blushing Bride and Whisper White cardstock, Floral Romance DSP 
Ink: Basic Gray, Blushing Bride refill with aqua painter to color flower
Blends: Light Old Olive, Light Smoky Slate
Tools & Embellishments: Tea Time Framelits, Pearl Basic Jewels, Polka Dot Tulle Ribbon, White Baker's Twine, 1" punch, 1 1/4" Scallop punch (retired now, use the new 1 1/8" punch instead), 1/8" circle punch, Dimensionals, Glue-Dots

Measurements
Blushing Bride: 7 1/4" x 2 3/4"; with 7 1/4" at top, score at 3/4", 4 1/8", 4 3/8", scrap to scallop punch
Pink Vellum DSP: 2 1/2" x 2 5/8"
Whisper White: 2 5/8" x 2 3/4" for the front layer; 3" x 2" to stamp & die-cut tea cup; scraps to stamp and die-cut the flower and to stamp and punch the greeting

Project 3--Pocket Card Tea Packet Holders

This last packet holder might be my favorite!  It's like a card, with something special tucked inside.


I made two different sizes.  The first one is perfect for a single tea packet, and the second one is big enough to add a gift card.

Smaller Card (3 1/2" square):

Supplies
Stamps: Tea Together, Humming Along (greeting)
Paper: Blushing Bride and Whisper White cardstock, Floral Romance DSP 
Ink: Rich Razzleberry and Sahara Sand ink pads, Blushing Bride ink refill with aqua painter to color light flower
Blends: Rich Razzleberry, Old Olive
Tools & Embellishments: Stitched Framelits, Tea Time Framelits, Pearl Basic Jewels, Blushing Bride Satin Ribbon (retired now, try Petal Pink Variegated ribbon instead), Tear Tape, Mini-Dimensionals, Glue-Dots

Measurements
White Card Base: 3 1/2" x 10 3/8", with 10 3/8" at the top, score at 3 1/2" and 7"
Flower Vellum DSP: 3" x 1 1/2" (front), 3" square cut in half on the diagonal (inside)
Blushing Bride: 3 1/8" x 1 5/8" (front); 3 1/8" x 3 1/4" (inside)
Whisper White: 3" x 1 /2" (to put under vellum DSP on card front); scraps to die-cut stitched oval and to stamp and die-cut flowers.
DSP for optional envelope: 6 1/2" square (follow instructions on the Envelope Punch board for 3 1/2" x 4" card.  You can also make one for 3 1/2" by 3 1/2", but it will be a tighter fit).

Larger Card (3 1/2 x 4 1/4):

The design for this card front was inspired by a card by Judy May.

Supplies
Stamps: Tea Together
Paper: Blushing Bride, Whisper White, and Rich Razzleberry cardstock, Floral Romance DSP 
Ink pads: Rich Razzleberry, Blushing Bride, plus Blushing Bride ink refill used with aqua painter to color light tea pot, Old Olive &  Rich Razzleberry Stampin' Write markers (colored directly on the rose rubber stamp)
Blends: Rich Razzleberry, Old Olive
Tools & Embellishments: Tea Time Framelits, Pearl Basic Jewels, Blushing Bride Satin Ribbon (retired now, try Petal Pink Variegated ribbon instead), 1 1/4" Scallop punch (retired now, use the new 1 1/8" punch instead), Tear Tape, Mini-Dimensionals, Glue-Dots

Measurements
White Card Base: 4 1/4" x 10 3/8"; with 10 3/8" at the top, score at 3 1/2" and 7"
Flower Vellum DSP: 2 7/8" x 3 5/8" (front), 3" x 3 3/4" cut in half on the diagonal (inside)
Blushing Bride: 3" x 3 3/4" (front)
Whisper White: 2 7/8" x 3 5/8" (to put under vellum DSP on card front); 3 x 4 1/2" to stamp and die-cut stitched tea pot; scraps to stamp and die-cut rose and oval.
Rich Razzleberry: scrap to die cut scallop oval
DSP for optional envelope: 6 3/4" square (follow instructions on the Envelope Punch board for 3 1/2" x 4 1/2" card.)

Thank you for stopping by!  I hope you enjoy these delightful tea party favors.  Let me know if you give them a try.  Remember, you can get the Tea Time framelits for free with a $100 order until March 31st.  After that, they will be available for purchase.  Use the following hostess code at my online store this month and you will receive 10 yards of Stampin' Up ribbon as a thank you gift from me:

 H4D2ZYKF

Happy Stamping!

~Marsha
Sunday, March 3, 2019

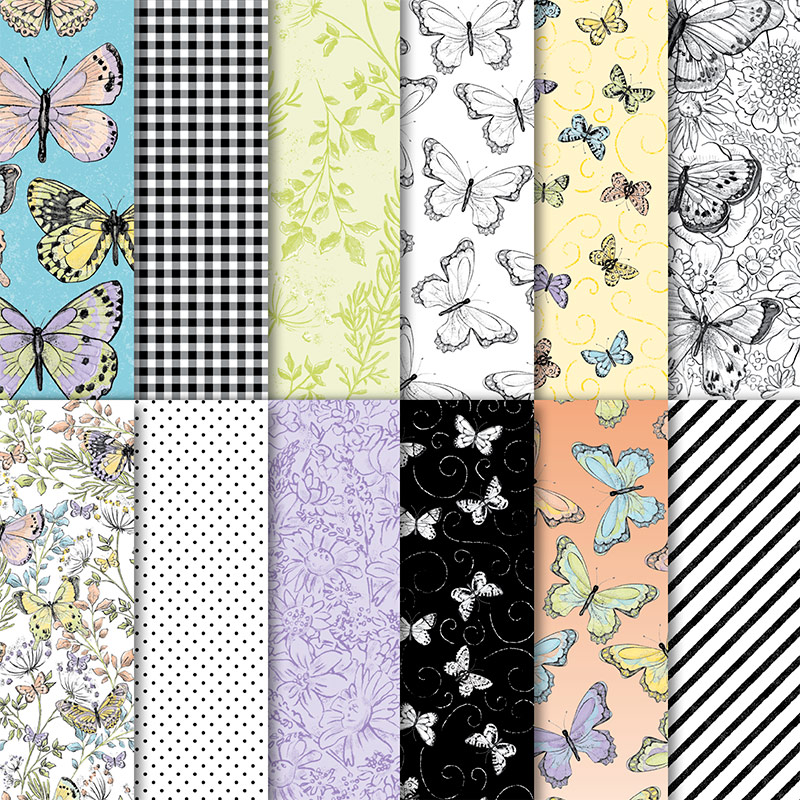
Botanical Butterfly Designer Series Paper


This year has some of the best Sale-a-Bration items ever, but my all-time favorite is the Botanical Butterfly DSP (designer series paper).  Not only is it stunning on it's own, it makes every project better!  I love how the paper has colorful designs on one side and black and white designs on the other side.

In the card below, there is a small strip of butterfly DSP on the left side.  The added butterfly is also from the DSP.  You can fussy cut these butterflies out or use the Butterfly Duet Punch to punch them out.  I cased this card from Rachel Tessman.


The butterflies on this Spring sampler also come from the Botanical Butterfly DSP.  (Class for this sampler will be March 30th).


This next card uses the black and white butterfly paper as well as the black and white gingham paper from the pack.  Add a little ribbon and a greeting and you've got a fabulous card!  I want to try this card with all kinds of different ribbon colors!


You can also use the papers from this pack without featuring the butterflies at all!  The polka-dot paper and black gingham paper come from this pack.


Here are a few other cards I made at classes with Janet Wakeland and Michelle Suit.


The butterfly paper is an absolute must-have!  Get some of your own by placing a $50 order in my online store before March 31st (the end of Sale-a-Bration).  Use the March host code when you place your order and get a sample of five different ribbons (2 yards each for a total of 10 yards, see colors HERE).  This is the code for March: H4D2ZYKF

Happy Stamping!

~Marsha

Thursday, February 21, 2019

Crafting Forever


I just love the sentiment "We are cut out to be friends" in the Crafting Forever stamp set.  It's how I feel about all of my stamping friends!  And then there is the saying, "Crafting forever! Housework whenever."  That seems to be my life motto! LOL!


This stamp set came out in the 2017-2018 catalog, but I didn't purchase it until a few weeks ago.  I really love it!

Measurements for the card above:

Very Vanilla cardstock: 
--5 1/2" x 8 1/2", score at 4 1/4"; 
--4" x 5 1/4" (to emboss with basket weave folder)
--4" x 4" to die-cut large heart
--2 1/4" x 1" to stamp the ribbon spool

Pool Party cardstock:
--4" x 4" to die-cut large heart

Other supplies:
Momento Black ink pad, Stampin' Blends--Pool Party, Smoky Slate, Crumb Cake; Pool Party Shimmer Ribbon, Silver and Pool Party Baker's Twine; Be Mine Stitched framelits; Basket Weave Textured Embossing Folder

How I put it together:
1. Use the Basket Weave textured embossing folder to emboss the 4 x 5 1/4" piece of cardstock

2. Die cut the large scallop heart with the stitched heart inside of it in both Pool Party and Very Vanilla.  Use the outside Pool Party frame and the inside Vanilla heart for this card (save the other pieces for another project).

3. Stamp the greeting and scissors on the vanilla heart and color in with Pool Party and Smoky Slate blends.  I used both shades.

4.  Attach the basket weave piece to the card base.  Wrap Pool Party ribbon around from the inside of the card to the front and tape it down (the heart will cover the tape).

5.  Attach the Pool Party heart frame to the card with glue. Attach the vanilla heart with dimensionals.

6.  Stamp the spool image and color with Crumb Cake blends.  Fussy cut the image and wrap Silver & Pool Party twine around it (I put a strip of tear tape on the back before I started wrapping to hold it in place both before and after I wrapped it).

7.  Attach the spool to the card with dimensionals and curl a little piece of twine the way you like it.  Secure in place by rolling up a glue dot and placing it under the twine to hold it where you need it.

That's it!  One more look at the final project:

These are a few other projects I made with my new Crafting Forever set.  I can't wait to create a 9" x 9" sampler with it!

The card above was cased from the current catalog.  The photo doesn't show the rhinestone on the scissors very well, but it adds some nice bling in person!

Cased from hmadeboutique.com
Cased from stampinstudio.com


Thank you for stopping by!
Please use the following host code for online orders during the month of February:  


2USMKSZU

If your order is over $50 (before shipping and tax), you will a spool of Textured Weave ribbon free from me (your choice of color).  Of course, it's also Sale-A-Bration time so you will get to choose free product from that promotion as well! E-mail me your choice of color after you place your order and I will send it to you at the beginning of March. 

Happy Stamping!

~Marsha~


Tuesday, February 12, 2019

Seasonal Framed Art

My latest obsession is making seasonal art samplers to frame in a 9 x 9 shadow box.  I have been very inspired by Audra Monk who posts detailed instructions and measurements on her blog each month, be sure to check it out! You will see her influence in my art below.


The Winter Shadow Box
This winter sampler is my favorite!  I love the silver embossing on the letters (thank you, Audra!), the shimmery glimmer paper, and the colors (Balmy Blue, Smoky Slate, Silver Foil, White, and Sparkle Glimmer Paper).  The Large Letters Framelits dies are a must when making samplers!  The gray card stock is Smoky Slate, but the stamping was done in Basic Gray ink.


The Valentine Shadow Box

This art sampler features the Be Mine bundle from the Occasions catalog and the All My Love DSP.  What a wonderful combination!  The colors are Crumb Cake, Flirty Flamingo, and Lovely Lipstick.  I used Audra's measurements HERE.


St. Patrick's Day Shadow Box

I made two versions for St. Patrick's day because I couldn't decide which elements I liked best.  I'll let my guests decide which one they want to make at the class. I used a lot of retired elements on this one, because I had them on hand and they worked so perfectly!  If you are wanting to re-create this, I hope you have them on hand too!  If not, come to my class on Feb. 23rd. 😉 The shamrock was made with the pansy punch--trim one flower petal into a stem.  The background color is Cucumber Crush.  The Rainbow Builder Framelit dies just happen to be on the Clearance Rack right now for only $18, which is perfect because I didn't get them the first time around!  I printed the Irish Blessing saying from my home computer.  The pot of gold is made with 1 3/4" circle punch, word window punch, scallop punch, and 1/4" circle punch for gold pieces.  The little Leprechaun is made with the Cookie Cutter Christmas Santa turned into a Leprechaun.  I found guidance for the leprechaun and the pot of gold punch art on Pinterest.

I'm following the lead of other demonstrators to host monthly framed art classes.  We've had two so far and it's been such fun!  I hold them the last Saturday of the month and I would love to have you join us! See the facebook event or my calendar for details, or e-mail me anytime--stampwithmarsha@gmail.com.  I'm happy to share additional close-up photos for these projects as well as measurements.


Thank you for stopping by!
Please use the following host code for online orders during the month of February:  


2USMKSZU

If your order is over $50 (before shipping and tax), you will a spool of Textured Weave ribbon free from me (your choice of color).  Of course, it's also Sale-A-Bration time so you will get to choose free product from that promotion as well! E-mail me your choice of color after you place your order and I will send it to you at the beginning of March. 

Happy Stamping!


~Marsha~

Monday, January 21, 2019

Minecraft Snowman


I saw these darling snowmen created by Nigezza Creates and wanted to make them myself.  You can click HERE to see her video tutorial.  When I finished the first one, my 7-year-old son said "I like your Minecraft snowman." Ha, ha, it does look like something from Minecraft!

My plan was to make one to decorate my piano, another to give to my long-time crafting friend for Christmas, and also to hold a class for others to come and make these.  Well....the project ended up being more tedious than I anticipated.  A lot of scoring, cutting, and embossing, and I kept making mistakes!  It's hard to tell from a distance, but you can see up close that the snowman has snowflakes embossed in white all over it.

That was the most time-consuming aspect of the project.  After making my first snowman, I didn't think you could really see the snowflakes that well anyway, so I didn't bother with it on my second one.  That was a mistake.  It looks fine, but the embossed snowflakes did add something that is missing in the second one.  Click on the first photo to see what I'm talking about.  It's subtle, but it does make a difference.  After making two of these, that was enough for me.  I think they are super cute, but I like quick and easy projects best!

Although I didn't get my friend's gift done in time for Christmas, I've filled it with goodies to give to her at our team meeting tonight.  There is still snow on the ground and it's freezing outside so a snowman works for me!
Bottom box, 4" x 4" x 3" Filled with gloves, tissues, and gum
Middle box, 3" x 3" x 2 1/2" Filled with socks and Turtle chocolates
Top box, 2" x 2" x 2" Filled with Valentine chocolates
This snowman looks cute on my piano right next to my other winter projects.  As a piano teacher, I spend a lot of time staring at the top of that piano.  It makes me happy to have beautiful hand-stamped creations to look at.


This Winter Shadow box sits on the other side.  Visit Audra Monk's website for awesome shadow box ideas.


Thank you for stopping by!
Please use the following host code for online orders during the month of January:  

 K9PMCQT7

If your order is over $50 (before shipping and tax), you will get a free classic ink pad from me (your choice of color) in addition to your free Sale-A-Bration products!  E-mail me your choice of color after you place your order and I will send it to you at the beginning of February. 

Happy Stamping!

~Marsha~


Thursday, January 10, 2019

New Catalogs, New Products!


Although I have a craft room full of stamps, ink, and paper, I still get so excited to browse through the new catalogs!  I attended OnStage in November where I first got to browse through the 2019 Occasions Catalog and 2019 Sale-A-Bration catalog, plus see and try out the new products.  I received some free stamp sets at OnStage, I've placed orders, and I've attended other stamping events which has given me lots of play time with new stuff!  Yippee!

Let's first take a walk through the Occasions Catalog to see some samples of the wonderful new products.  Some of the cards show products from both the Occasions catalog and the Sale-A-Bration catalog which I will shorten to SAB Catalog when I give page numbers.

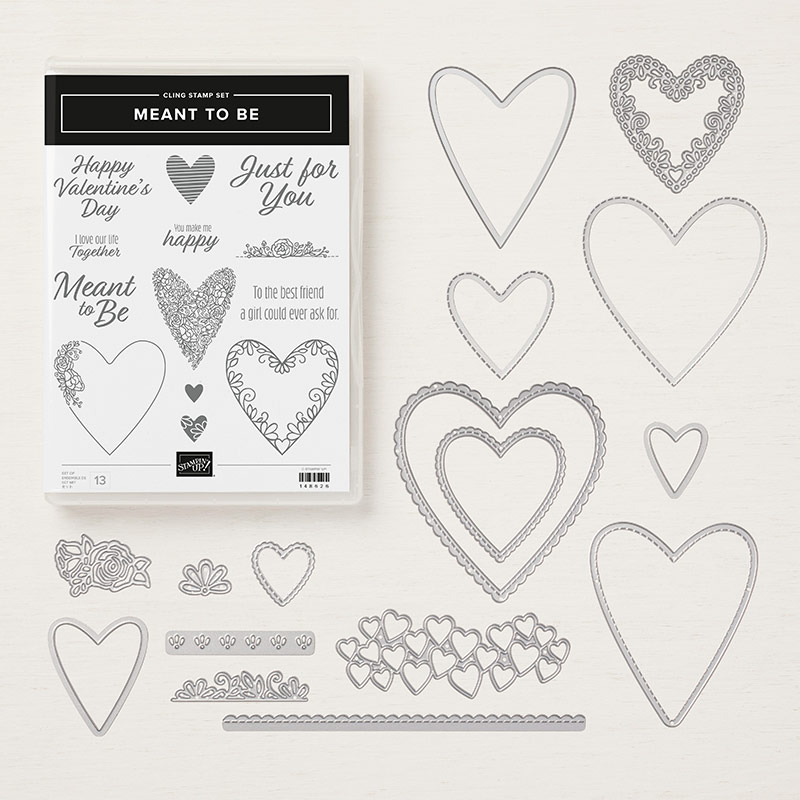
Turn to pp. 4-7 of the Occasions Catalog to see the gorgeous All My Love Suite.  It's perfect for Valentines Day, Weddings, Thinking of You, and more!  The suite includes the Forever Lovely Bundle, the Meant to Be Bundle, gorgeous paper, and embellishments such as Heart Epoxy Droplets and All My Love ribbon.

The Meant to Be Bundle was one of the first bundles I ordered.  As soon as it arrived, I had to test out all the die-cuts.  Aren't they wonderful?
Meant To Be Cling Bundle

These are a few cards I've made so far:


These are some photos I took of the display boards at OnStage featuring the Forever Lovely Bundle.

I made the first card below at OnStage and the second card at a class with Janet Wakeland.

I had the opportunity to go to an event put on by Janet Wakeland where I played with many items from the new catalog.  Most of the following projects were made at her studio or at OnStage.  I made a few on my own with inspiration from Pinterest.

Wonderful Romance (p.11), Well Written Framelits Dies (p. 27), Gingham Gala DSP (p. 35) and the ribbon is a free item in the Sale-A-Bration catalog:

Beauty Abounds Bundle, (p.13)

Sweetest Thing (p. 15)

Incredible Like You (p. 21)

Bloom by Bloom (p. 25)


Amazing Life (p. 28)

Nine Lives (p. 32), this card also shows the Heart Epoxy Droplets colored in with a Stampin' Blend.

Butterfly Bundle (p. 35) and Botanical Butterfly DSP (p. 9 of SAB catalog).

Humming Along (p.36)

Needle & Thread Bundle (p. 39)

Geared up Garage Bundle (p. 43)
Card made at Inkerbelles Team Meeitng with Michelle Suit


Artfully Aware (p.46) and Strong & Beautiful  (p. 48)

Tea Together (p. 49) plus Tea Time Framelits Dies (p. 17 of SAB catalog)

Here are a few more projects made with items from the 2019 Sale-A-Bration Catalog:

Hello Cupcake (p. 6 SAB)
Card design cased from Amy Koenders, inspired by catalog sample


Home to Roost (p. 11 SAB)


Lasting Lily (p. 19 SAB)

Card design cased from Jan Clothier
Card design cased from Mary Fish

Here are a couple of photos from OnStage.  It was such a blast to be with my stamping friends.  Join us at the next one!

My awesome team leader and longtime friend, Michelle Suit.

Members of the Inkerbelles Stamp Team.  Millie made us the awesome scissor headbands!


Thank you for stopping by!

Please use the following host code for online orders during the month of January:  

 K9PMCQT7

If your order is over $50 (before shipping and tax), you will get a free classic ink pad* from me (your choice of color) in addition to your free Sale-A-Bration products!  E-mail me your choice of color after you place your order and I will send it to you at the beginning of February. 

Happy Stamping!

~Marsha~


*If you place your order before my monthly Make & Take class, you can choose to attend my class for free instead of getting the ink pad.  See my calendar HERE.