Thursday, February 9, 2023

Get Well Soon Gift Pouch


Today I want to share this adorable get well soon gift pouch.  I first saw this idea from Dawn Griffith
HERE back in 2016.  I recreated it using new product and slightly changed the measurements.  This was a make & take project at my recent craft retreat and it was a huge hit!  From the front compartments, you can pull out a package of tissues and a package of Halls drops.


On the back of the package, you can attach a pack of chicken noodle soup.


It's nice to have a little gift ready that I can take to friends who are under the weather.

You can watch THIS VIDEO to see me make this project step by step.

The measurements are below (all in inches).

Backdrop & Tissue Compartment:

  • Daffodil Delight : 4-1/4" x 10-1/4", with 10-1/4 side at the top, score at ½", 1-3/8", 3-3/4", and 4-5/8"
  • Lemon DSP (from Tea Boutique pack): 4" x 3"
  • Striped DSP on the back (from Day at the Farm pack): 4 x 5-3/8


Front piece to hold cough drops: 

  • Daffodil Delight: 3 x 4-1/2, with 4-1/2 side at the top, score at 1/2 and 1-5/16 (1-1/4 plus 1/16th)
  • Striped DSP: 2-3/4 x 2-15/16 (3 minus 1/16th)


Strip on the back to hold the soup:

  • 1-1/4 x 4-9/16 (4-1/2 plus 1/16th)
  • With 4-1/2 side at the top, score in ½” from each side
  • DSP (Lemon pattern): 1 x 3-5/16 (3-1/4 plus 1/16th)

You will find a list of supplies used at the end of this post.  Thanks for stopping by today!  I hope you give this project a try!

Happy stamping,

Marsha


Product List

Wednesday, January 4, 2023

Post-it Pouch with Adorable Owls


It's an exciting time of year with the arrival of the new Mini Catalog and the Sale-a-Bration Brochure!  I used the new Adorable Owls set and the Friendly Gnomes set to make some cute post-it note pouches.  These are great little gifts for Valentine's day or to tuck into an Easter Basket.  The owl set is a Sale-a-bration item you can get free with a $50 order placed between Jan 5 through Feb. 28th.


Following are the measurements for the pouch.  You can also watch me make it in THIS VIDEO.  Please note: These notes are not the Post-it Note brand and the measurements won't fit that brand correctly.  These measurements are made to fit the Highland Notes brand. 
  • Real Red Cardstock: 3-1/4" x 8-1/2"
  • With 8-1/2" side at the top, score at 3-1/8", 3-9/16" (one tick past 3-1/2), 6-5/8", 7-1/16"
  • DSP strip (from Country Floral Lane): 1" x 3-1/4"
  • Use a corner rounder punch to round your top and bottom corners.
  • The bling is the new Opaque Adhesive-Backed Gems
  • I used Blushing Bride cardstock for the greeting strips.
The Friendly Gnomes set is available in the Mini Catalog which goes live tomorrow!  The set coordinates with the Gnome dies from the retiring Holiday Catalog.  Now we can have gnomes all year long! I used the Country Floral Lane DSP and Country Gingham DSP.


Thanks for stopping by!  Don't forget that Sale-a-bration starts tomorrow which means you get free product with every $50 order.  When you place a $50 order and use the monthly host code at check out, you also get a free gift from me!

January Host Code: 3WAMPFAM

Happy Stamping!
Marsha


Thursday, August 25, 2022

Show off your DSP with this fun card pattern!


Today on my Facebook Live, I shared this fun card pattern using the Storybook Gnomes DSP (Designer Series Paper).  You can watch the video HERE.  I tried this pattern with several of the new papers in the Holiday June-July 2022 Mini Catalog.  I love them all! I used some retired sets for the sentiments which shows you can make beautiful cards with your DSP, whether or not you have the coordinating stamp sets.  I always make sure to buy a sample of ALL the DSP in a new catalog by offering and participating in a paper share (4 people share a package of every DSP in the catalog).  This is the inside of my little Gnome card.  All three gnomes were die-cut right from the paper.

This card design is easy to make.  Here are the measurements:

  • Card base (Balmy Blue): 5-1/2" x 8-1/2"
  • Basic White cardstock layers (cut 2): 4" x 5-1/4"
  • DSP strips for the front (cut 3 different patterns): 3/4" x 3"
  • DSP strip for inside: 1/2" x 4"
  • Choose images from your DSP to fussy cut or die-cut, pop up on dimensionals
  • Add bling and/or ribbon
  • My ink was Pacific Point and I used the retired set--Holly Jolly Wishes--for the sentiments
Here it is with Sweetest Christmas Paper, Adhesive-backed Seasonal Sequins, and retired Frosted Gingerbread set for the sentiments:


Here it is with Santa Express DSP; the sentiments are from Santa's Delivery set, and for the bling I used the coordinating Adhesive-backed Stars from the suite.


My final version uses the Rustic Harvest paper and the Adhesive-backed Seasonal Sequins again.  I used two different retired sets for the front and inside greetings: Gather Together and Pretty Pumpkin.  The cardstock base is Cajun Craze.


I hope you'll give this fun card pattern a try!  I'd love to see what you make.  Come share it on my Happy Stampers with Marsha Facebook group.

Thanks for stopping by today.  Please use the following host code on your orders in August: NHFSBF9T.  If your order is over $50, I will send you a pack of bling from the Holiday catalog.

Happy Stamping,
Marsha

Product List for Gnome version

Thursday, March 17, 2022

Fun Fold Card with Surprise Gift Bag Inside!

I don't know who first came up with this creative card idea, but I sure love it! I learned how to make it from Cindy Fodor.  I saw her card at a demonstrator event and thought it was amazing.  I don't live near my siblings, so I always send them birthday cards with a gift card inside.  This is a fun way to package it.  It is a little bulky, so plan on adding some extra postage!

The first time I made this design, I used the Friendly Hello Designer paper which was a free Sale-a-bration item in the recent promotion. 


That paper is no longer available, but there are so many fun designer papers you could use!  I went with the Pattern Party DSP for today's card.  You can watch the VIDEO HERE.


These are the measurements (in inches):

  • Thick White cardstock: 4-1/4 x 11, score at 3-1/2 and 8-1/2
  • DSP for gift bag (inside the card): 4 x 9-1/2
  • With the DSP in the landscape direction, score at 1/2, 1, 4-1/2, 5, 5-1/2, and 9
  • Turn the DSP so it's in portrait direction and score at 1 and 3-1/2
  • DSP for front left (polka-dot): 3-1/4 x 4
  • DSP for front right and inside right (heart pattern): 2-1/4 x 4 (cut 2)
  • DSP for inside left (striped): 2-3/4 x 4
  • White for inside: 3-3/4 x 3-3/4
  • Pumpkin Pie or Bermuda Bay for inside: 4 x 4
Once you cut and score the gift bag section, the following picture is a helpful template to know what sections to cut out, where to put the adhesive, ribbon holes, etc.

You can see a list of supplies at the end of this post.  If you give this card a try, please let me know!  If you make it before March 23, you can post it in my Happy Stampers with Marsha Facebook group with the following hashtag: #giftbag  You will get entered to win a $5 class coupon on March 23rd.

The host code for March is CJZXFQ7X; please use this code when placing online orders under $150 and you will get a free gift from me! If your order is over $150, you will still get the free gift, but don't use the host code because you get your own host rewards!

Happy Stamping!
Marsha

Product List

Wednesday, February 16, 2022

Accordion Fun Fold Cards


Hello to my poor neglected blog!  Although I've been sharing new ideas weekly on my Wednesday Facebook Lives, I haven't managed to blog about them for quite sometime.  I hope to do better!

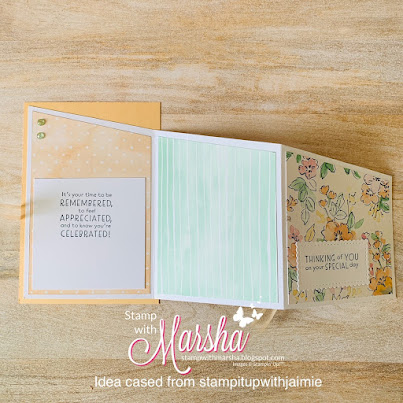
Today I made this beautiful "fun fold" card.  I pinned this idea many months ago from Jaimie Babarczy, and finally gave it a try.  What a great way to showcase beautiful DSP!  For my first attempt, I did it nearly identical to Jaimie's with the lovely Hand-Penned DSP.


My second version of the card features one of my favorite designer papers--the lovely Friendly Hello DSP.  You can get this paper free, along with the coordinating stamp set when you place a $100 order during Sale-a-bration (ends Feb. 28th).  I love the soft colors and the sheer ribbon, it's so delicate!


Measurements in inches:
  • Pool Party (back piece): 3-3/4 x 5-1/2
  • White (accordion folded piece): 5-1/4 x 10-1/2; score at 3-1/2 and 7
  • DSP short panel: 3-1/4 x 3-5/8
  • DSP medium panel: 3-1/4 x 4-1/4 (cut 2)
  • DSP tall panel: 3-1/4 x 5
  • White piece inside: 3 x 3 plus scrap to die-cut front label piece
Instructions:
  • I recommend watching THIS VIDEO to best understand how the diagonal cuts were done, but I will also try to explain it below.
  • On the large white accordion piece, mark the right side with a pencil 3-1/4" up from the bottom.  Use your paper trimmer to cut from this mark all the way to the left corner.
  • On the short panel, mark the right side with pencil 3" up from the bottom.  Use your paper trimmer to cut from this mark to the top left corner.
  • On the medium panel, mark the right side with pencil 3-5/8" up from the bottom.  Use your paper trimmer to cut from this mark to the top left corner.  Repeat this with the other panel, but put the pencil mark on the left side and cut on the diagonal from left to right.
  • On the large panel, mark the right side with pencil 4-1/4" up from the bottom.  Use your paper trimmer to cut from this mark to the top left corner.
  • Put the DSP panels on the white accordion piece as shown in the pictures above.  The medium panels will go on both sides so you see that design when the card is open and closed.
  • Attach your accordion piece to the Pool Party back piece.  Add the white paper on the inside.
  • Die-cut your greeting piece with the Stitched So Sweetly dies, and stamp the sentiments with Inspired Thoughts stamp set.  Add to the front panel with dimensionals.
  • Tie ribbon around the card to hold it closed.  I used adhesive on the back to hold the ribbon in place.
I can't wait to give this design a try with more papers!  If you decide to give it a try, post your creation on my Happy Stampers with Marsha Facebook group by February 22nd with the hashtag #accordion to get entered to win a $5 class coupon.

Please use the following code on February orders and get a free gift from me: 3GJTBJ2S.

You can see the supply list below (I forgot to include Basic White cardstock).

Happy Stamping!

Marsha

Product List